Knafeh Semolina

knafe8

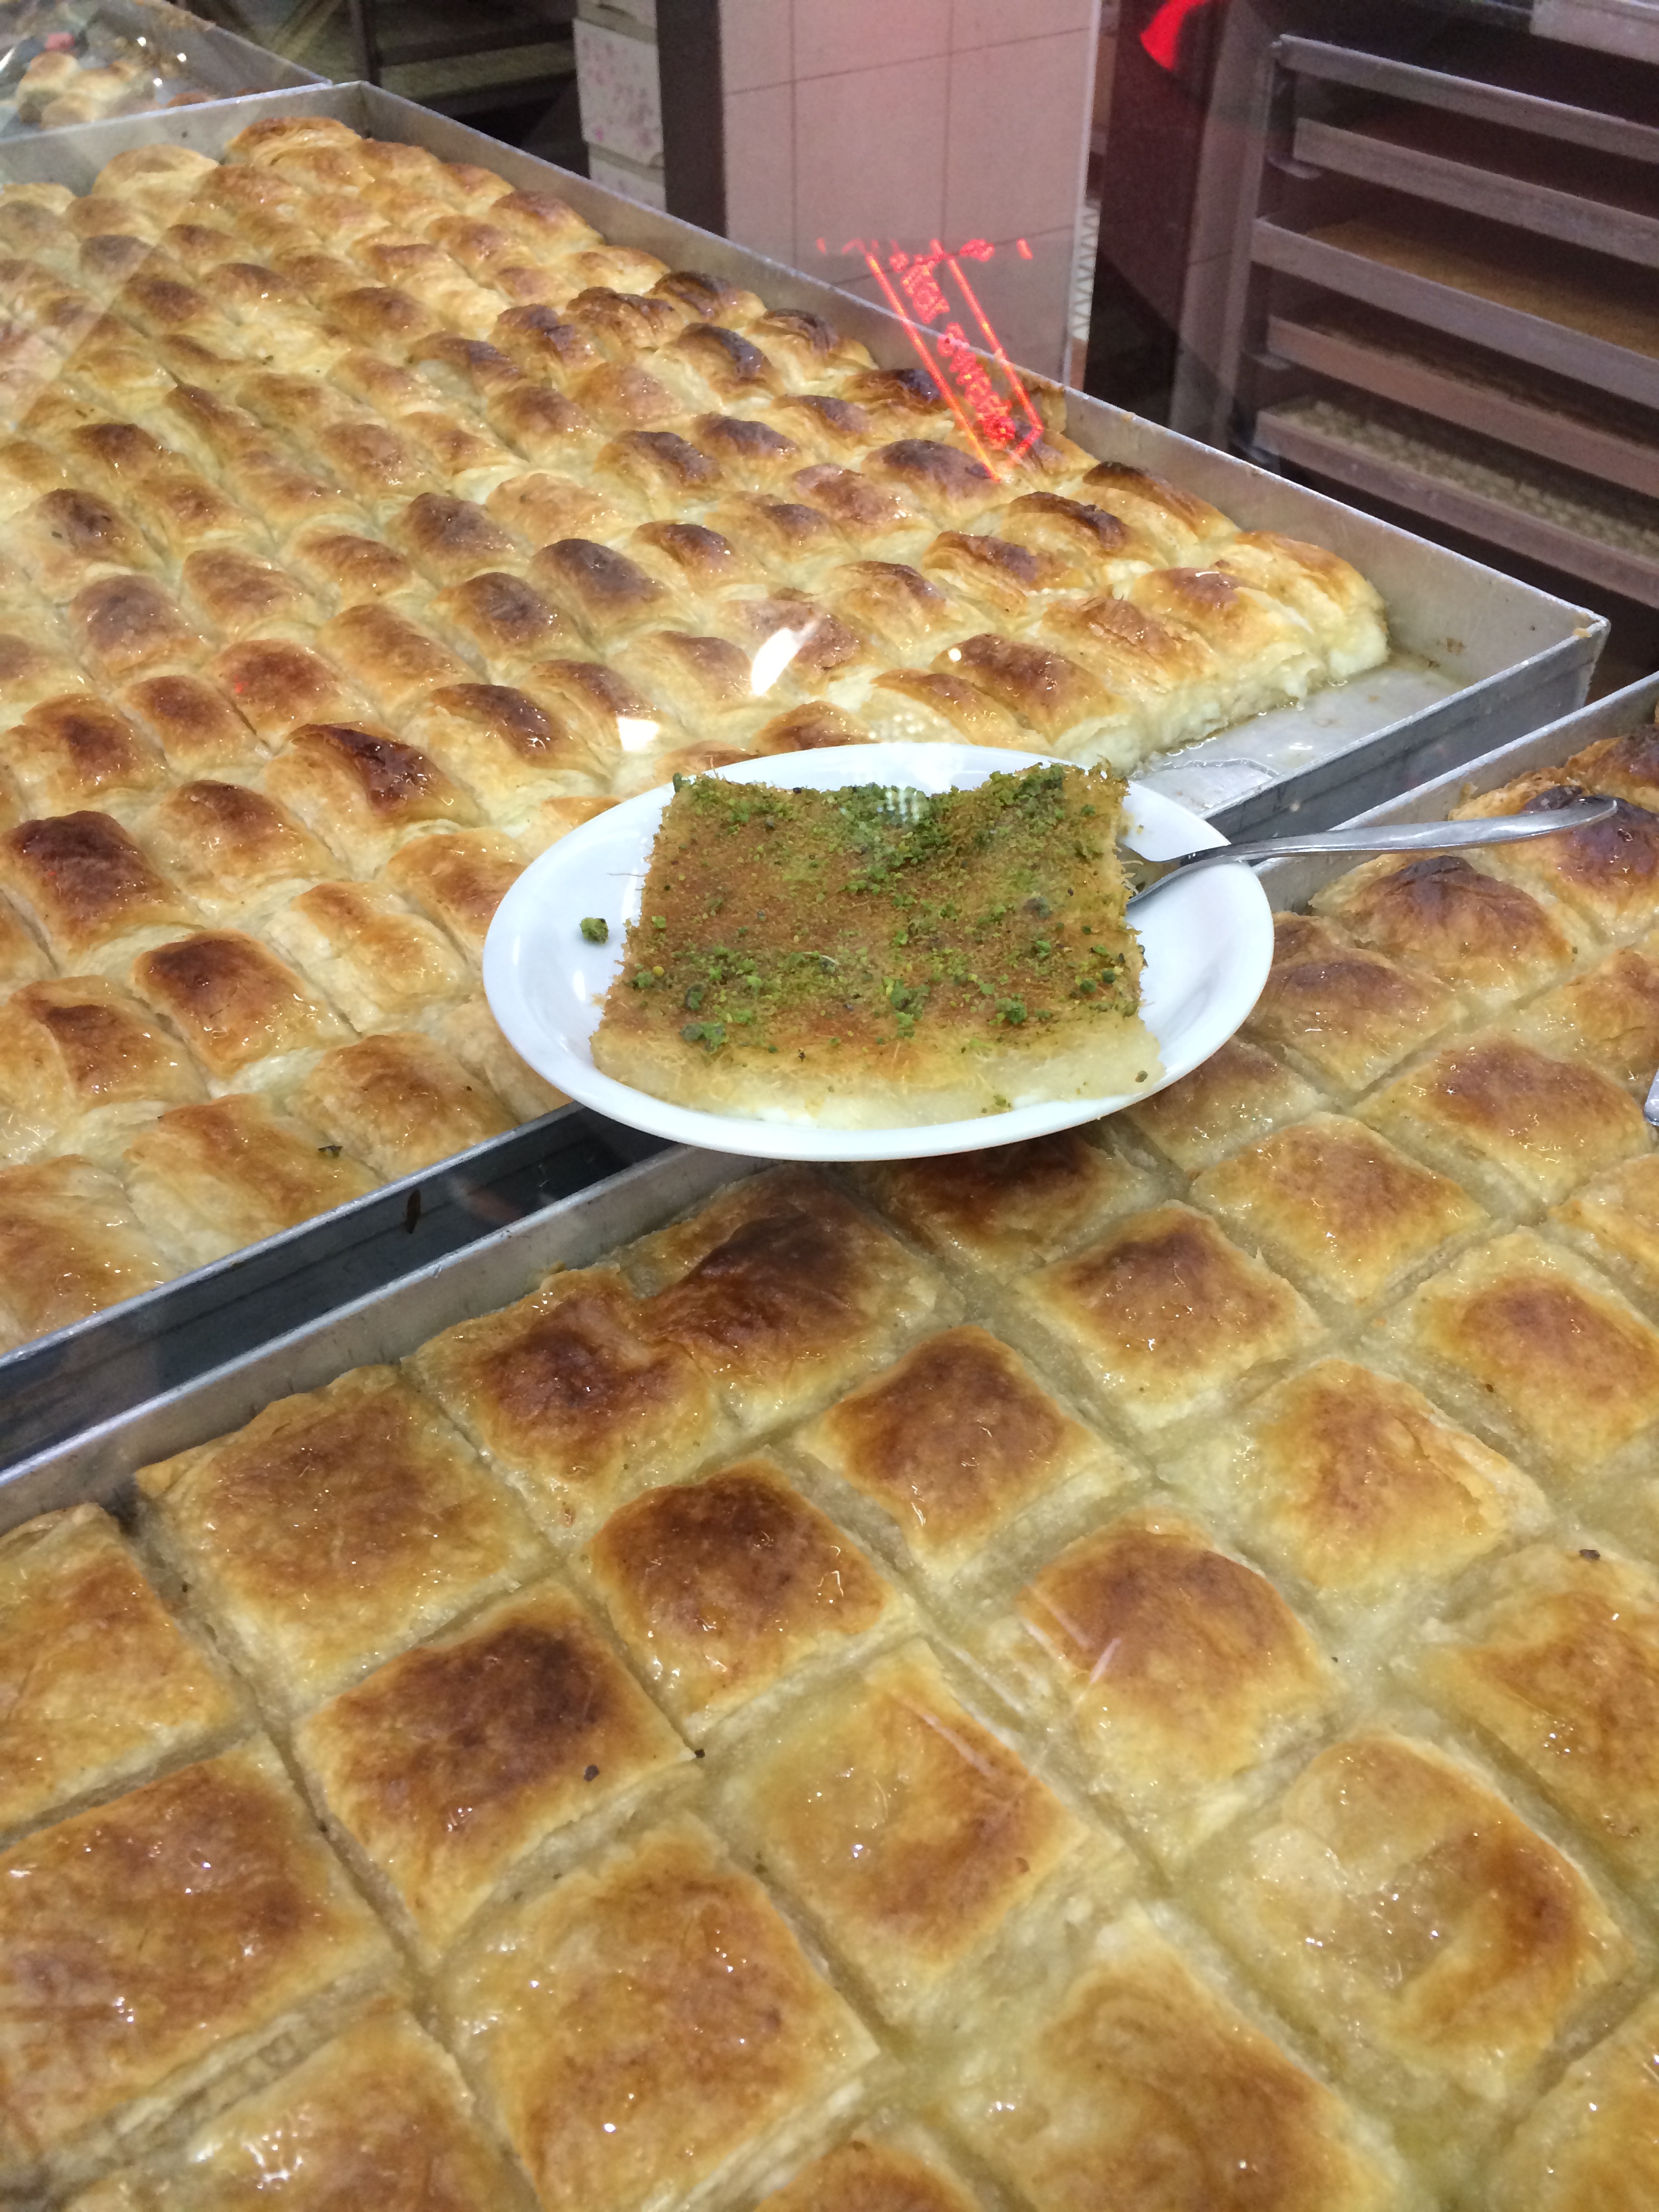
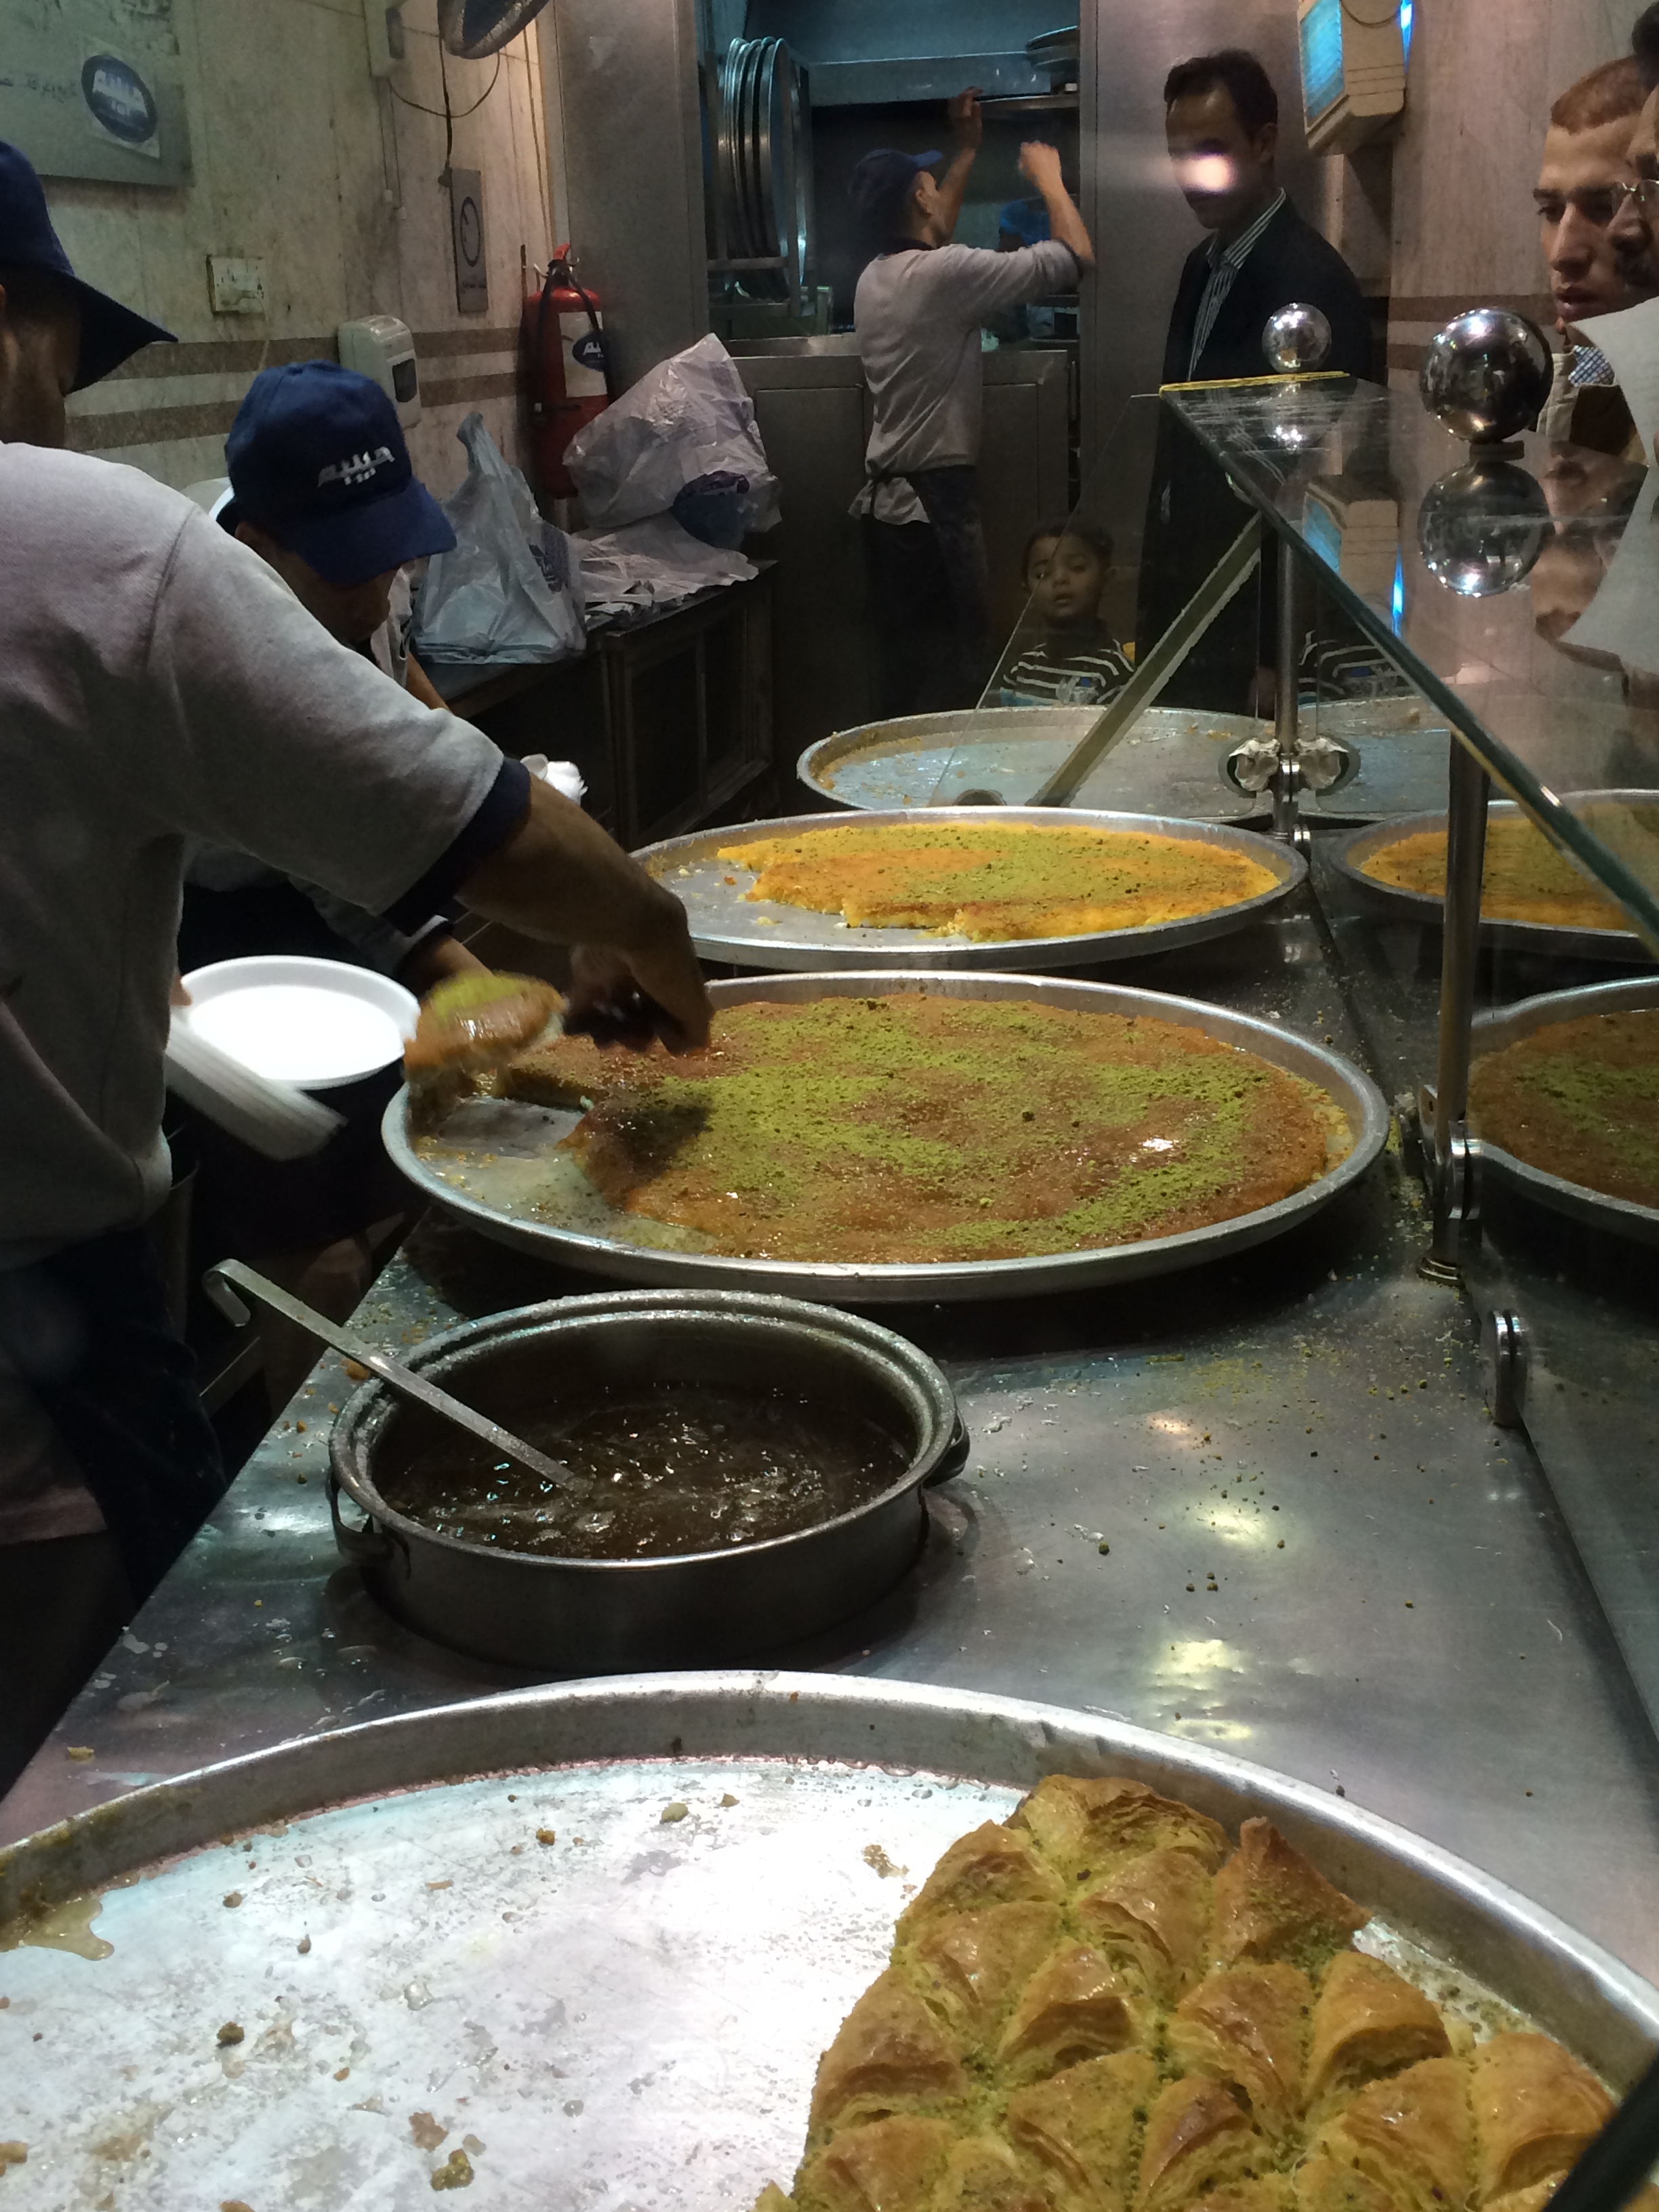
Knafeh…the crown jewel of Palestine, the pinnacle of Levantine desserts, one only needs to utter the word  “knafeh” to anyone in the know and you immediately gather from their reaction we are talking about something really special here. Just one bite alone of the hot, sweet, salty, gooey, crunchy, perfumed seduction will make you fall in love with the Middle East. There are many versions of knafeh laboriously prepared throughout the Levant, but the knafeh to be reckoned with, the knafeh not to be missed, comes from Nablus, Palestine. Other cities present strong contenders however – I devoured a mean knafeh in Nazareth – following the intoxicating aromas of baking knafeh led me down desolate narrow streets to beautiful trays of the coveted delight in the old market in Khalil – and lines around the block gather every evening in Amman, Jordan with regular patrons hoping to score a sizzling slice from Habiba Knafeh. I’ve heard wonderful things about the knafeh from Lebanon and Syria as well.

IMG_4487
Knafeh in a Nazareth bakery
IMG_6503
Look at the eager faces waiting for their slice of knafeh at Habiba in Amman. I had the same face!

However, the best knafeh I ate was in the small Palestinian village of Tur’an, at my friend Vera’s family home, whose family I’d promised to visit while I was traveling across Palestine. Her mother cried when I arrived and we hugged, and I informed her that the last hug in particular was from her daughter back in the states. Eagerly anticipating my visit, her mother must have prepared at least 14 different delicious dishes for dinner, and insisted I have two helpings of each one, not unusual in keeping with legendary Palestinian hospitality. I instantly felt like part of her family and throughout the evening I observed in each family member different yet unmistakable elements of Vera’s personality.

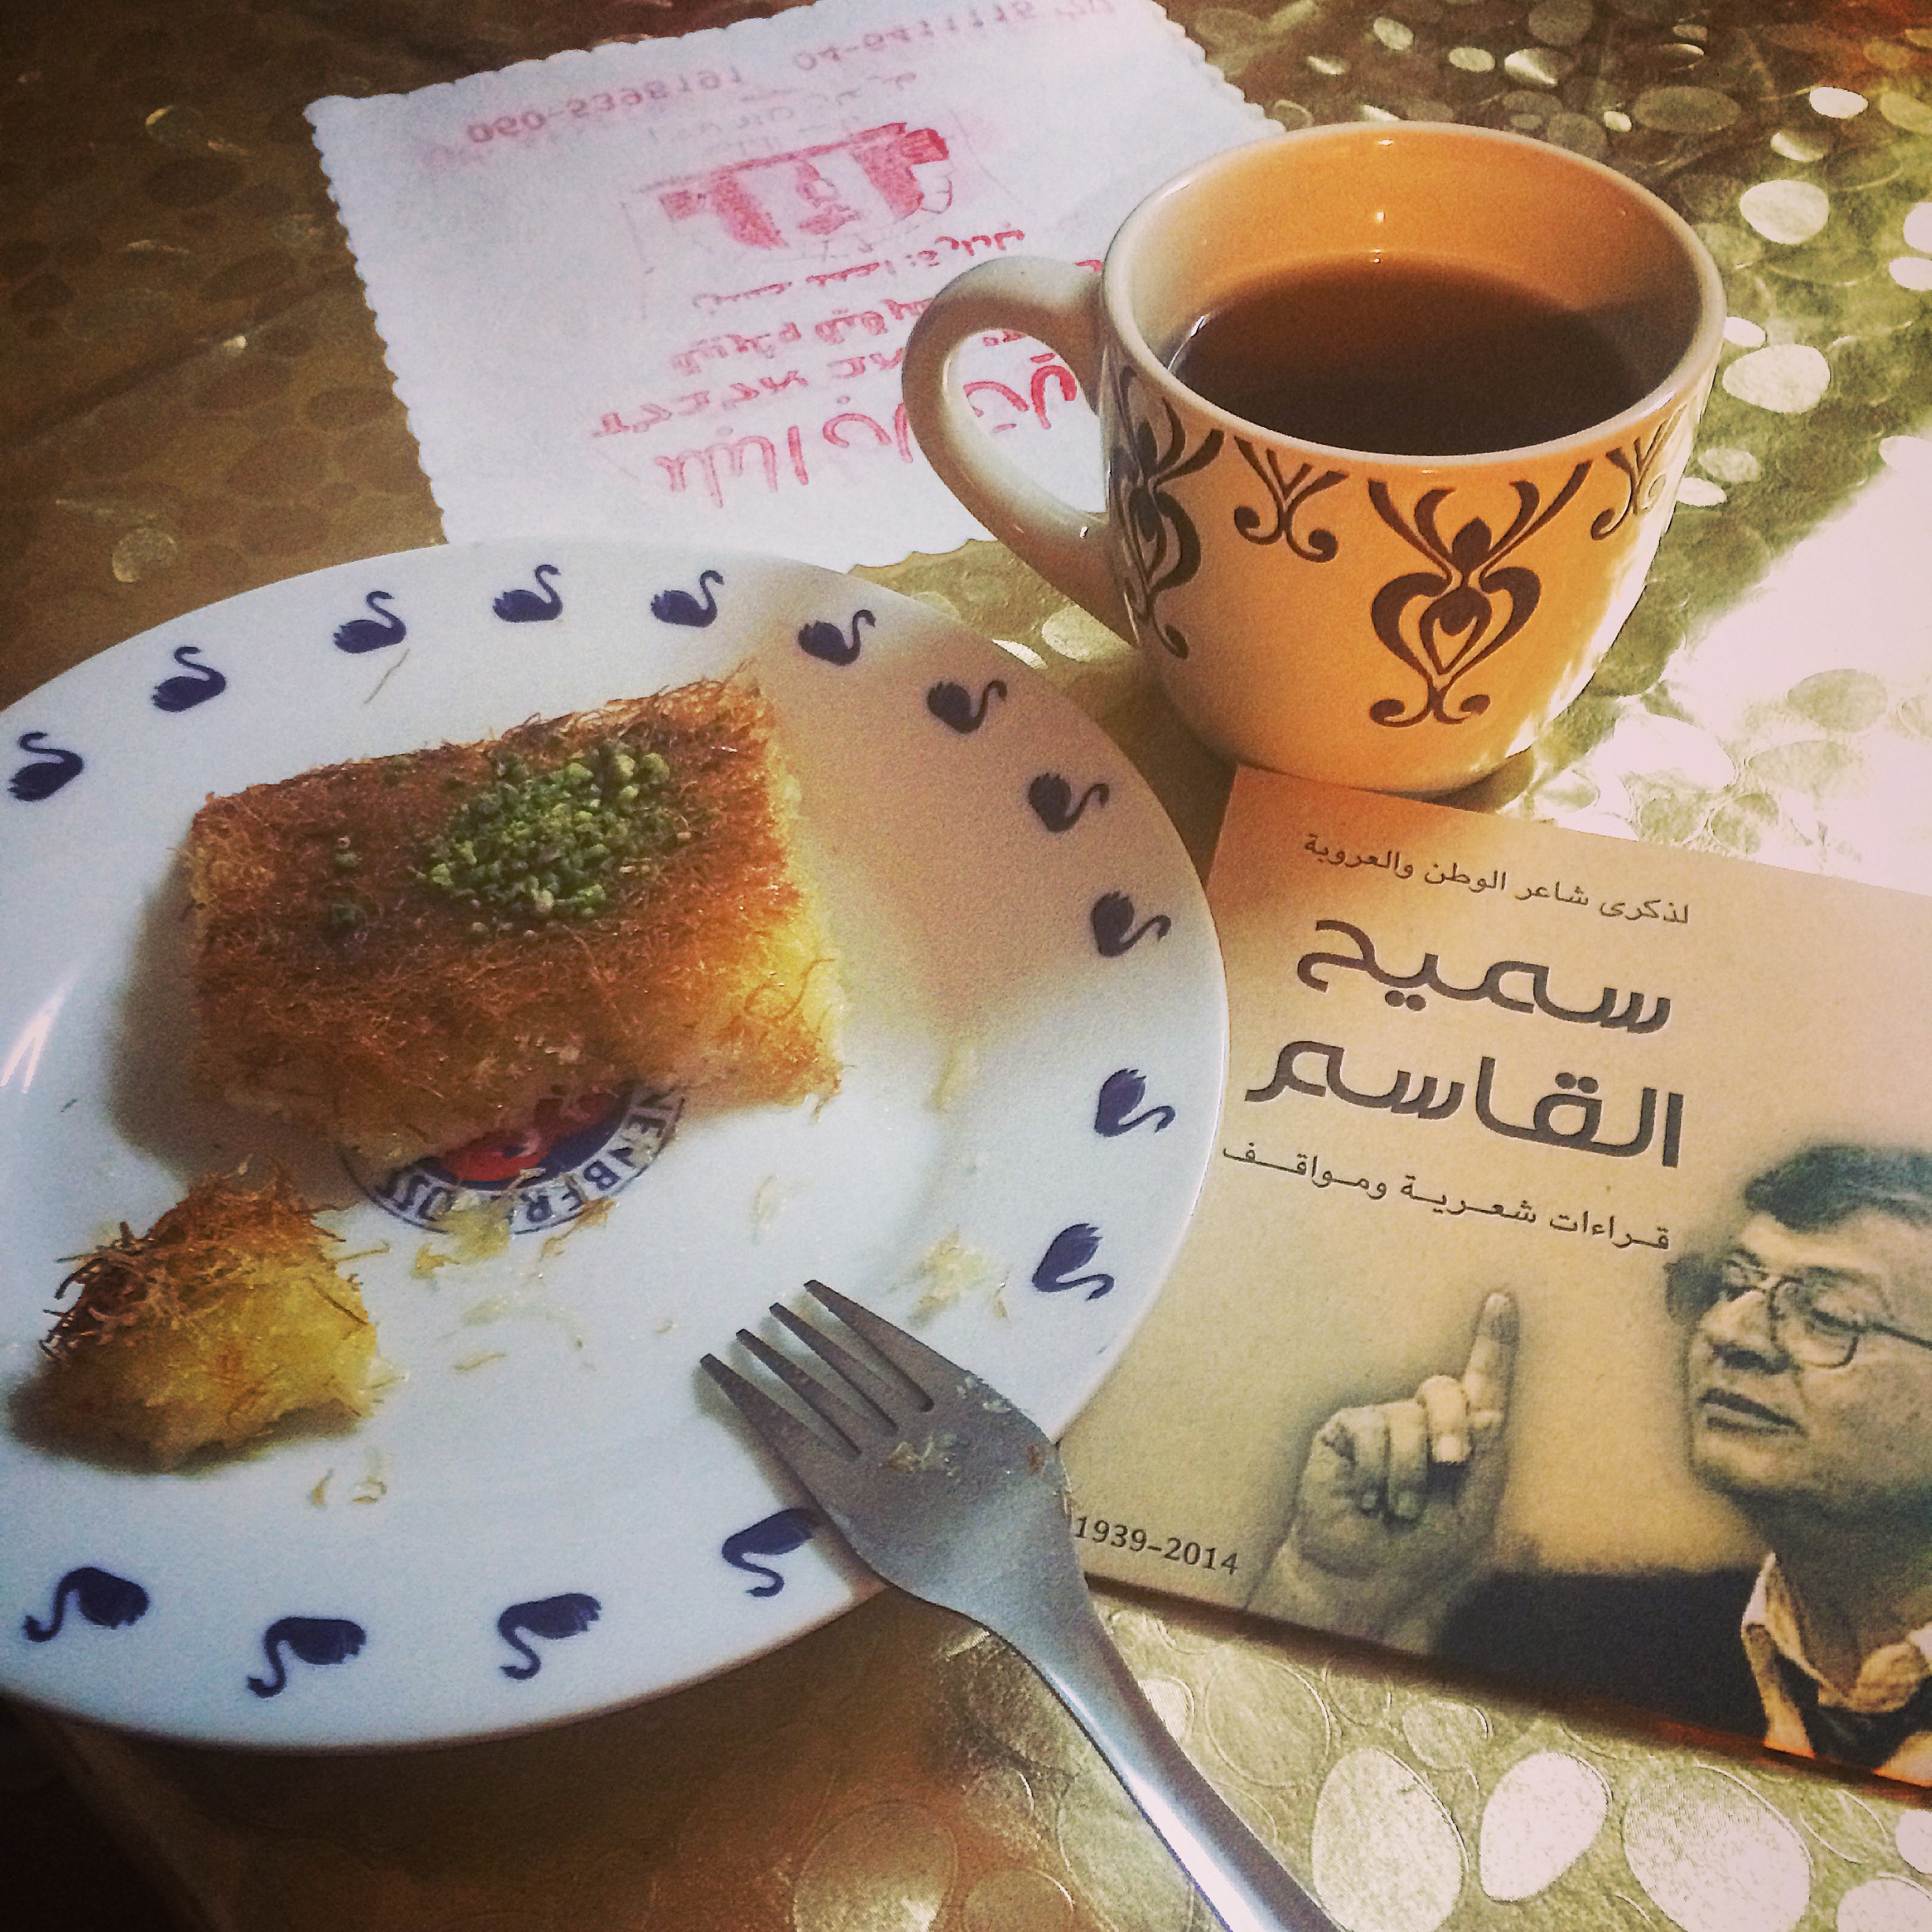
After dinner playing with the kids, looking at old photos, skyping with Vera, our conversation turned more solemn as we exchanged somber stories of their life in Palestine throughout the years and the incomprehensible things I witnessed my first week there, including the trial it was to even make it to Tur’an that day. As we chatted, our bellies still stuffed to the brim, I hadn’t even noticed her dad had slipped out of the apartment until he returned smiling carrying a bakery box. Inside the box, still piping hot, wafts of toasted golden deliciousness, melted cheese and orange blossoms taunted my nose while her dad and mom beamed with pride upon learning this would in fact be the first slice of knafeh I would eat in Palestine.

It was nothing short of what knafeh dreams are made of, but perhaps it was sweetened a tad by the sentimental moments I shared with her family that evening that I will forever cherish. As we savored every last bite, washing it down with shai maramiya (sage tea), I lamented about not being able to stay longer having to make a long late-night trek through back roads back to Jerusalem. Before I left they gave me a CD of the honored national poet Samih Al-Qasim, who had passed away just a few weeks before, while they made clear I always had a welcoming home there awaiting my return.

IMG_3936
Delicious knafeh and shared memories in Tur’an

I don’t think there is any home recipe that can replace the experience of enjoying a slice of knafeh fresh on the street, complete with the sounds of tantalizing sizzles as ladels of hot syrup are poured atop, but here is my best version that is beginning to earn me a little reputation in Washington, DC. Some recipes call for using kataifi (shredded phyllo) pastry, I prefer the Nabulsi style made with semolina (“smeed” in Arabic). It takes a bit longer but it is more authenic, holds up to the hot syrup better, and is so worth it!

For the semolina (smeed) crust: 

3 cups semolina (“smeed” in Arabic) – use 1 cup of coarse and 2 cups fine for best texture

2 sticks butter or 1 cup of ghee (ghee will provide a more authentic flavor)

1/2 cup water

1/4 cup orange blossom water

1/4 cup rose water

1/2 cup sugar

1/4 teaspoon sea salt

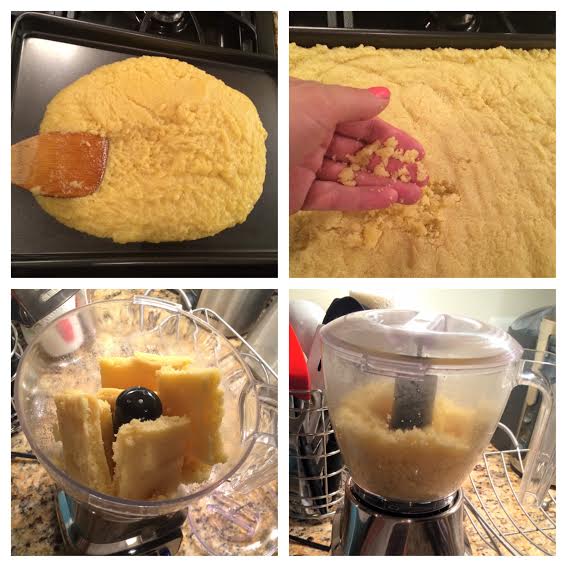
Preheat oven to 350 degrees. Bring the water, orange blossom water, rose water, sugar, salt and butter (or ghee) to a boil in a large saucepan. Once it comes to a boil, add the semolina. Stir constantly on medium heat for about 2 minutes. Remove from heat. Spread the mixture evenly on a large sheet pan with at least 1/2 inch sides (or use a 9×13 cake pan or anything that will allow the mixture to spread out to about half an inch). Bake at 350 degrees for about 10-15 minutes, just until it is firm but not yet browning. Remove from oven and let cool. Flip over on a clean surface and break into large chunks to be milled into fine crumbs. You can do this one of two ways: (1) with your hands, rub together large pieces between your palms until it is all fine crumbs; or (2) place the large chunks into a food processor and pulse a few times until all fine crumbs – this is a lot faster, but I prefer to do it with my hands when time permits. You now have the proper crust for knafeh. You can make this ahead of time and keep in fridge or freezer. I make sometimes a double batch and keep leftovers in freezer and then you are always ready to make knafeh!

knafe1

To make the knafeh:

1 batch semolina crust crumbs (recipe above)

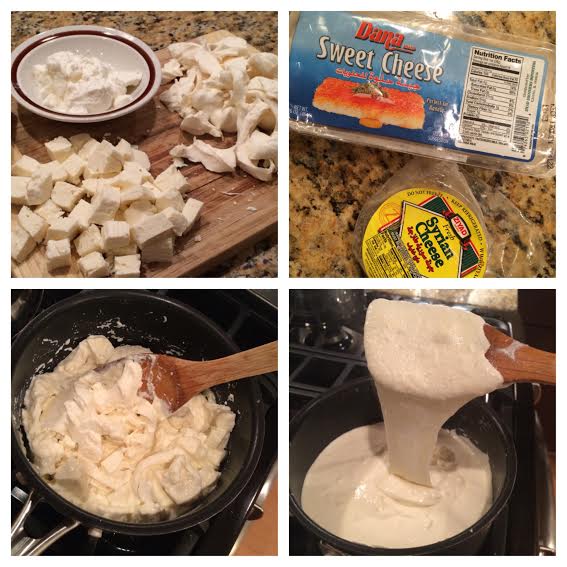
1 lb akawi cheese shredded, crumbled, or cut into 1/4 or less slices – should be about 2 cups (see note on cheese)

Akawi cheese is a semi-salty Palestinian farmer cheese (named for the city of Acre). You can find it in some Arab or middle eastern groceries. There are also Syrian and Lebanese versions of it. I’ve also used Syrian cheese (its literally called “Syrian cheese”) and had good results, its a little salty, which I think makes for a tastier knafeh as it contrasts nicely against the sweet syrup and crunchy, sticky semolina crust. Some recipes I’ve read call for soaking saltier farmer cheeses in water and changing water a few times to draw out the salt. I think this is nonsense! But do what you like 😉 I’ve had great results also using Oaxaca cheese (a Mexican handmade string cheese that melts nicely – available in Latin markets). I’ve also done this using various combinations of several cheeses above and melting together in a saucepan first with a few tablespoons of cream and tablespoon of semolina, sometimes adding some ricotta, or cheese curds (as shown in photo below). But if you like a stringy, melty cheese, do not do this. Both ways are goods, its a preference of texture. Mozzarella can also be used as a last resort, but try to locate the real Arab cheeses its worth it!

knafe2

To assemble the knafeh, take a bit more than half of the semolina crumbs and evenly sprinkle, covering the entire bottom of a well-greased (use butter or ghee only) round baking pan, 16 to 18 inches. You can use a sheet pan also. Press the crumbs firmly into the bottom of the pan. Press crumbs into the sides of pan for a nicer presentation with neat sides. Layer the cheese shreds/crumbs/slices evenly -or- pour melted cheese (if you used this method) on top of the pressed crumbs. Sprinkle the remaining semolina crumbs evenly over top of cheese and press down lightly. Bake knafeh in a 350 degree oven for about 45 minutes or until the semolina crumbs on the top are starting to look golden and it looks a bit bubbly. Your kitchen should smell amazing by now!

knafe3

While knafeh is baking, make the attar syrup:

In a small sauce pan, whisk 1 cup of sugar with 3/4 water and 2 tablespoons of rose water and 2 tablespoons of orange blossom water. You can vary the proportions of rose and orange blossom water to your taste. You can also add in a tablespoon of fresh lemon juice. Just try to stick the rule of 1 cup sugar to 1 cup water ratio. Boil on medium heat stirring frequently until sugar is dissolved and syrup begins to thicken. The whole process takes about 6-8 minutes. Don’t let it get too thick or start to brown, you want it thin to pour over the hot knafeh, no thicker than maple syrup.

knafe4

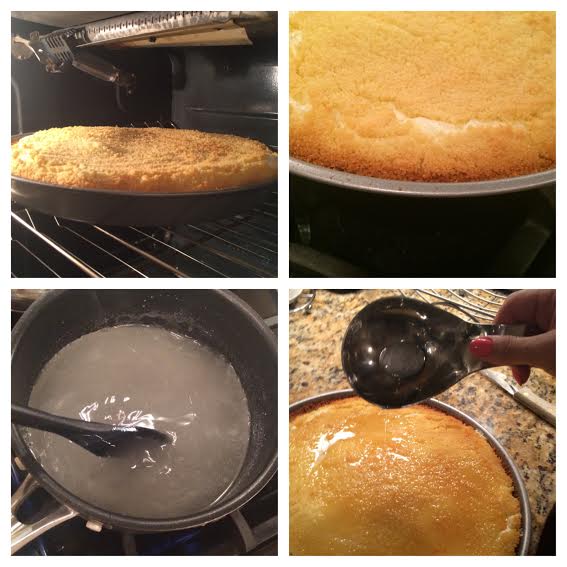
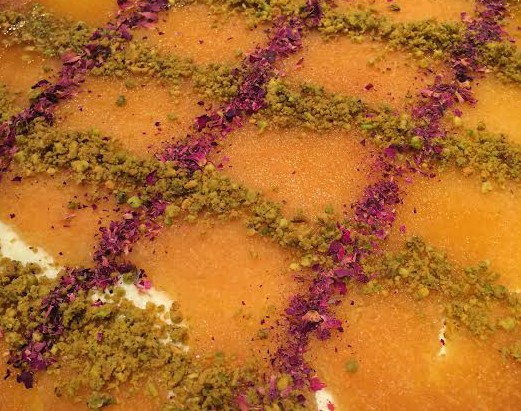
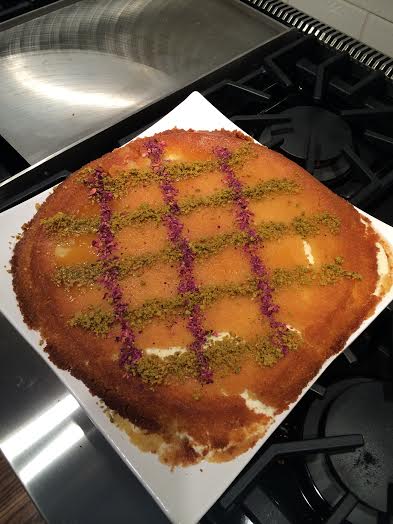
Check on your knafe! Once the semolina crumbs are looking golden, remove from oven, let cool only about 5 minutes. Run a knife around the side of the pan to loosen. Then place your serving dish on top of pan and quickly but carefully flip over using potholders of course. Once flipped over give the pan a good tap in the middle. Carefully lift up the pan, if you greased it well it should all come out without sticking! Ladel large spoonfuls of the attar syrup over the hot knafeh. Decorate top with crushed pistachios (I use a mortal & pestal, but you can also pulse them in a food processor, just be careful not to turn them into a paste!). I like to make a diamond pattern and I also use crushed rose petals alternating the stripes, for a very lovely look! Serve knafeh warm with extra attar along side. Sahtain!

Dre <3

knafe6

P.S. I tried reheating cold knafeh in a frying pan with a tiny bit of butter, its awesome this way, skip the microwave!


Asian Meatball Lettuce Wraps with Dipping Sauce

This recipe is easy to make, healthy and the lemon grass, ginger, and cilantro really surprise the palate, in a good way of course! I first made these for my housewarming in my new apartment and they were truly a hit, everyone asked for the recipe so here you go. As party hors d’oeuvres, I made smaller meatballs and wrapped a piece of butter lettuce around it securing with a toothpick. As a mid-week meal I make them larger and serve on top of lettuce. You could also ditch the lettuce if that’s not your thing and serve them over rice or with any vegetable. IMG_5495

1 pound ground chicken

1 egg

2-4 tablespoon of unseasoned bread crumbs

2 cloves garlic finely chopped

1×1 inch piece of ginger, grated

1 reed of lemon grass, white part only, finely chopped; or 1 tablespoon lemon grass paste

1 tablespoon low-sodium soy sauce

1 tablespoon fish sauce

1 teaspoon of sesame oil

1 handful of fresh cilantro, chopped

2-3 green onions chopped, including green tops

1/4 teaspoon fresh ground black pepper, or about 5-6 grinds of the mill

grapeseed oil or refined virgin coconut oil (refined does not have coconut flavor) for frying meatballs (note – you can use corn oil here but grapeseed and coconut oils have higher smokepoints and are better for frying at high temperatures)

Butter lettuce leaves to serve

Mix all ingredients together in a large bowl (not the frying oil or lettuce obviously!) with a wooden spoon or with your hands is preferable. Start with only 2 tablespoons of the bread crumbs, if mixture feels too wet, add more one tablespoon at a time but do not add more than 4 total. I usually don’t add more than 2, even if mixture is a bit sticky, too much bread crumbs will dry them out. I do not add salt to this dish because the soy and fish sauce contain sufficient salt, even the low-sodium version is enough for my taste, but feel free to add salt to your liking. Heat the frying oil in a large frying pan, and shape meat mixture into 1×1 inch balls. If mixture is sticky, it helps to keep a bowl of cold water near by and wet your hands before rolling each meatball. Fry meatballs for 3-4 minutes on each side for a total of 10-12 minutes, or until cooked thoroughly inside and golden brown outside. Drain meatballs on papertowel and serve on top of lettuce leaves. Garnish with lime wedges and cilantro leaves if you like. Serve with asian dipping sauce (recipe below).

asian Asian Dipping Sauce

3 tablespoons of low-sodium soy sauce

3 tablespoons of rice vinegar

3 tablespoons of fish sauce

1 green onion finely sliced (white and green parts)

I tend not to measure things unless I’m baking, so these measurements are approximate! Mix all ingredients together in small bowl and serve along side the meatballs. Enjoy!

IMG_5499

Grilled Salmon with Dill Sauce and Lemon Dill Yogurt

Here’s a quick and easy way to prepare salmon, best of all its delicious, light and summery! I used a stovetop grill pan, but you could use an outdoor grill, a frying pan, or even bake the salmon. I used one large wild sockeye filet cut into 4 serving pieces. I recommend to purchase salmon with the skin on, its less likely to fall apart on the grill and the salmon skin crisps up full of flavor. For the yogurt sauce buy the best Greek or Middle Eastern yogurt (labneh) you can find, the brand I love is Turkish, called Ulker, you can find it in Middle Eastern groceries. I use this for so many things, I go through 2 large cartons a week! It’s the best!

IMG_7972

Marinade for the salmon:

2-3 tablespoon good extra virgin olive oil

2 tablespoons honey

Juice of 1 lemon

Zest of 1 lemon divided in half (save the other half for the yogurt sauce)

1 clove garlic minced

2-3 tablespoons fresh dill chopped

Sea salt and pepper to taste

1 large salmon filet with skin on, cut into four serving pieces

Mix all marinade ingredients together. Season the fish with salt & pepper and place in a shallow plate. Pour the marinade on top and let sit 15-20 minutes. On a very hot grill pan, grill, or frying pan (lightly brushed with olive oil) sear skin side down (important) for 1-2 min, then flip and cook 2 – 4 more minutes, depending how well done you like your salmon (or not) Very important, don’t throw away the leftover marinade!! Pour it into a small frying pan and cook down until reduced halfway, about 5 minutes, then add 1 small pat of butter. Pour this delicious sauce over the fish, it makes the dish!

IMG_7971

To make the lemon dill yogurt sauce:

3/4 cup of good Greek or Middle Eastern yogurt

Juice of half a lemon

Zest of other half of lemon (set aside from above)

2 tablespoons chopped fresh dill

Sea salt and fresh ground pepper to taste.

Mix all ingredients together in a small bowl and serve along side the fish. You could warm it up if you like on the stove, but don’t let it cook. The flavors will also intensify if you make this ahead of time and let it sit for at least 30 minutes or more.

Serve the salmon and yogurt with grilled veggies. To grill asparagus, just lightly brush grill or pan with olive oil, grill just a few minutes on each side so spears stay crisp and retain bright green color. Season with sea salt & pepper. Bon appétit!

Grilled Halloumi and Glazed Apricots

First post, let’s start with something incredibly simple. I love recipes like this…simple ingredients, simple preparation…with flavors that pop. You can literally make this in minutes and everyone will be impressed. Salty, sweet, sour, tangy, earthy, and fresh all at the same time. A perfect mid-summer Mediterranean dish!

IMG_8702

6 oz halloumi cheese, cut into 1/2 inch thick slices

4 medium size or 6 small fresh apricots, cut in half and pitted

1 tablespoon wildflower honey

1 tablespoon fresh lemon juice

1-2 tablespoons balsamic vinegar

1-2 tablespoons high quality extra-virgin olive oil

Sea salt and fresh ground pepper

Fresh lemon wedges

Fresh mint chopped

Place the honey, vinegar, lemon juice, olive oil, pinch of sea salt and fresh ground pepper in a bowl and whisk together with a fork. Add the apricot halves and toss until coated with the glaze. If not using an outdoor grill, heat a grill pan to almost smoking, and brush with a little olive oil. This is what I use most often in lieu of an outdoor grill…apartment living doesn’t really facilitate outdoor grilling, so get yourself a good quality heavy panini or grill pan with a heavy press lid, its worth its weight in gold and will allow you to achieve the same char as an outdoor grill (but make sure you open a window or you may be setting off the smoke alarm lol) You will only be missing that smokey layer of flavor from the outdoor grill that adds another delicious layer to the dish. Not the same I know, but so many other flavors happening here I doubt you’ll notice. Either way, start with grilling the halloumi cheese slices first (otherwise the apricots and glaze may leave a sticky mess and your cheese will stick to it). Halloumi is a semi-hard fresh goat/sheep milk cheese, it wont fully melt but will soften a bit and char nicely, giving it an addicting flavor. Grill the cheese for 2-3 minutes each side until a deep, toasty char is achieved. Set aside and cover to keep warm. Now brush the pan or grill lightly with olive oil again and grill the apricots, 1-2 minutes each side, don’t move them around or they will stick and could get mushy (depending on ripeness). In general when grilling anything, let it be until its time to flip so you ensure you have nice grill marks and allow proper flavors to develop. Arrange the warm grilled apricots and grilled halloumi cheese on a plate, squeeze more fresh lemon juice on top, and sprinkle generously with chopped fresh mint. Enjoy!

Hello, welcome!

Hi there! Welcome to my inaugural post on Bites By Dre. I’m Dre and I’m a foodie! I’m so thankful to finally have my blog up and to be able to share with all of you one of my biggest loves and passions…food. You see I believe that food is so much more than daily nourishment for the body. To me, few things are more rewarding and more important in life than sharing a lovingly prepared meal with my closest friends and family. Food brings us together in so many ways that we often overlook how central it is to the core of our being. Treasured memories are triggered with just one whiff of an aroma, the soul is comforted by our favorite dishes when we feel down, and every important milestone and celebration in our life is typically accompanied by something delicious made special just for the occasion. Food provides us the perfect excuse to spend time with a dear friend, opens windows to other cultures, transports us back to far and foreign places we’ve traveled, or maybe it just takes us back home to our mother’s kitchen table, wherever that may be in this world. It tells a story of our heritage, of our values, of where we’ve been, and inspires where we’d like to go. It prompts us to loyally defend the dishes of those cooks that have forever changed the landscape of our taste buds: “Ain’t nothin’ like my __________’s (insert family member/friend’s name here)  ___________ (insert tastiest dish you’ve ever had here)!“….save for those rare moments when our eyes light up because, OMG, this tastes just like the one my mother makes! 🙂

Think about it, that feeling you get walking into your grandmother’s house after a long drive and smelling homemade chocolate chip cookies baking in the oven, made just for your arrival — and a couple spoonfuls of raw cookie dough she set aside for you just  to pop in your mouth.

Recall nights sitting at your kitchen table as a child doing your homework, trying so hard to focus while your mother is whipping up something amazing, even if it was as simple as breakfast for dinner, one of my childhood favorites and my mom’s go-to meal when she was too tired cook, and I’m simply talking “juicy” egg yolks (my childhood term for eggs over-easy) with hot buttered toast; or something as elaborate as peppers picked from the garden she grew herself stuffed with meat and rice, roasting in the oven.

Envision stopping for a shore lunch on an uninhabited island in the middle of Canada’s great lakes, and salivating as your father prepares walleye fish just reeled out the water over a stone fire, served with nothing but a squeeze of lemon…and if you got to eat the walleye cheeks, well then you knew you were special!

IMG_4837

Imagine the excitement of firing up the grill in the midst of an unforgiving Chicago winter, pretending for a slight moment “what if it were summer already?”, while your grill-master brother tosses on very particular lamb chops that required a special trip through questionable south-side neighborhoods to the Greek butcher because well…you just wouldn’t fathom going anywhere else to buy lamb chops!

Picture walking through an open-air market in central Mexico, your senses assaulted by unfamiliar sites and smells at every corner, watching curiously as men in one stall stretch yard-long strands of handmade Oaxacan string cheese, while in the next stall over women top handmade tortillas with frijoles, chapulines (dried grasshoppers) and the same freshly-made cheese over a hot comal (Mexican griddle).

Perhaps you recall the first time you boiled rose water and cardamom pods on on the stove to make syrup for namoura (middle eastern dessert) and were so overcome by the intoxicating perfumed aroma you felt cheated, wondering “where has this amazingness been my whole life!?” Okay okay, so these are my memories, not yours, but you get the point and I’m sure you can relate with your own stories…its about creating memories, feelings, experiences, delights for the senses, and most of all enjoying life and sharing with others.

So my earliest memory in the kitchen was around 4 years old, attempting to “cook” using a  toy set of plastic pots and pans with molded cartoon faces. I put one of the plastic pots on the stove and turned on the burner, melting the plastic right to the stove. I still have a fuzzy image in my head of my mother’s panic and of the cartoon face who’s smile had melted into a unhappy frown..the irony. Well, I’d like to think my cooking skills have advanced a little since then!! But you can be the judge…

dreaaa5

My philosophy on food and cooking is simple…. …hospitality always comes first. I read a list once of things every grown woman should have – on it was a set of 8 matching place settings, stemware, and a recipe that will make her guests feel honored. I couldn’t agree more! Make everything from scratch when you can…most of the time its easier than you think and tastes so much better; the more rustic and ritualistic the cooking process, the more I love it. Use the freshest ingredients you can find, don’t hold back on the spices, don’t overlook the importance seasoning with sea salt and fresh ground pepper, it makes all the difference. Ethnic markets are your friend, don’t be afraid to explore and talk to the people that work in them about what you are making they will usually be happy to share tips. But my most important piece of advice is to always cook with love in your heart and whatever you make will always be delicious (a little music also never hurts) 🙂 Please enjoy!

~Dre